
A few weeks after I launched my site, I opened Google Search Console and realized none of my pages had been indexed. The status in GSC said: Crawled – Currently Not Indexed.
I spent some time reading guides, asking AI, and just trying things out as I went. The WordPress SEO checklist below is what I ended up working through — a record of everything I checked, in the order I checked it.
Fixing GSC Indexing Issues – WordPress SEO Checklist Start
When I first opened the Coverage Report in GSC and saw that long list of unindexed pages, I finally understood: publishing a post doesn’t mean it gets indexed.
As I wrote in SEO Cognitive Series (Part 1): Google crawls, then indexes, then ranks.
Here’s what I checked.
Check the “Discourage search engines from indexing this site” Setting
In the WordPress admin, go to Settings → Reading. Scroll down. There’s a checkbox that says “Discourage search engines from indexing this site.“
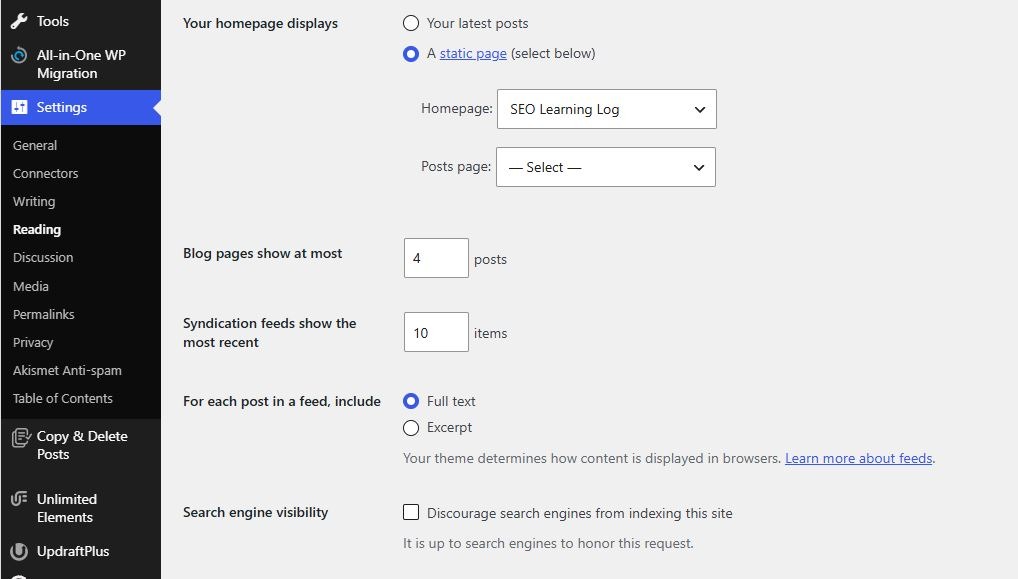
If that box is checked, you’re telling every search engine to stay out. I checked mine — it wasn’t.
This one is easy to miss. A lot of beginners check it during setup and forget to uncheck it later. The site goes live, content goes up, but the “do not enter” sign is still on the front door. This is the first thing to verify.
Check robots.txt
Next, check your robots.txt file.
This file tells crawlers which parts of your site they can and can’t access. You can view it by going to yourdomain.com/robots.txt in your browser.
I checked two things:
- The file existed and returned content
- It didn’t block Googlebot with a
Disallow: /rule
To be safe, I also ran it through GSC’s robots.txt tester to confirm that my core pages were marked as “allowed.”
Check the Sitemap
I checked three things with my sitemap:
- Where is it? Rank Math auto-generated it at
sitemap_index.xml - Is it working? The file loaded fine when I visited it
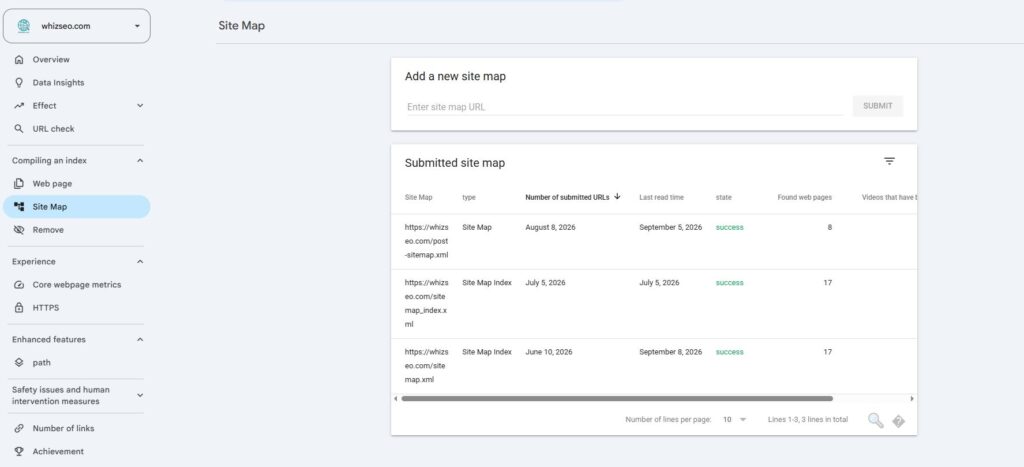
- Is it submitted to GSC? No — I had generated it, but never submitted it
That last step is easy to forget. Go to GSC → Site map, paste your sitemap URL, and submit it. Google won’t know it exists unless you tell it.
Clean Up the Unindexed Pages List
After checking the basics, I went back to the Pages report under Indexing in GSC.
That report splits into two sections: indexed pages above, and unindexed pages with reasons below.
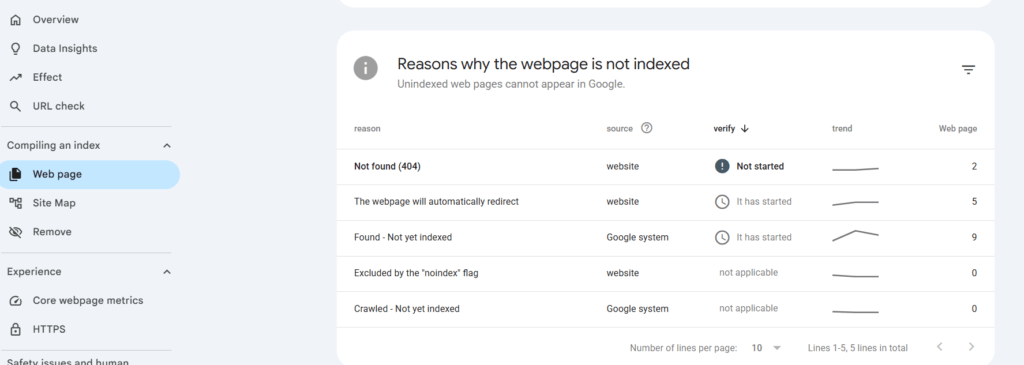
I copied each unindexed URL into my browser and looked at what it actually was. Not everything needs to be indexed. I found two categories I could ignore:
Old pages that had already been deleted. GSC takes time to update. If a page is gone but still in the report, just leave it — GSC will drop it eventually.
Elementor template pages. These are temporary files created by the editor. They don’t need to be indexed, and they’re not real content.
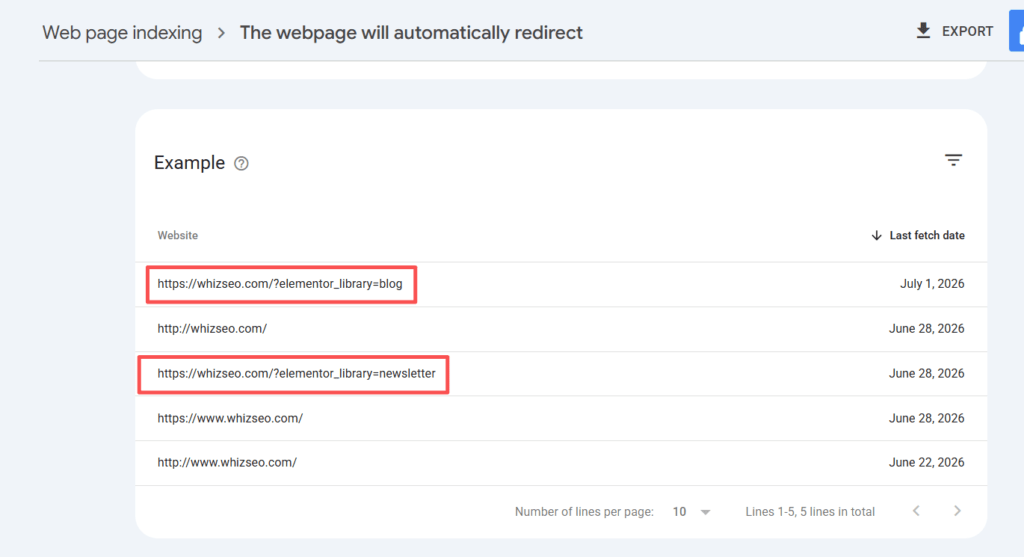
For anything I wasn’t sure about, I screenshotted it and asked AI. It’s useful here — it gives you a direction to investigate instead of leaving you stuck.
On-Page SEO
Once indexing was sorted, I circled back to the original question: what now? The site had content and was live, but I didn’t know what to optimize next. That’s when this checklist moved into its second phase: on-page SEO.
I asked DeepSeek to take a look at my site. It came back with three specific suggestions.
Update Your Homepage Title and Meta Description
The first one hit home.
Search results show two things: the title and the meta description. The title is the big blue link. The meta description is the gray text below it. Neither directly affects rankings, but they decide one thing — whether someone clicks through.
It pointed out that my homepage title — “A Path of Growth” — was too vague. It didn’t tell anyone what the site was actually about.
It was right. If I saw “A Path of Growth” in search results, I wouldn’t click either. It doesn’t tell me anything — doesn’t look like an SEO blog, doesn’t look like anything familiar.
It gave me a few options. I picked the one that fit best, updated the title and meta description, and refreshed the homepage. The site suddenly felt like it had a clear direction.
Your title tells people who you are. Your meta description tells them what you offer. Worth spending a few minutes on — check if your homepage title actually says something, and if your description makes people want to click.
While I was at it, I went through every other page and post on the site to make sure the titles and descriptions were complete. It’s not complicated work, but it changes how the site feels — from “a blog by someone unknown” to “a learning log with an actual person behind it.”
The second suggestion was breadcrumb navigation.
I had no idea what that meant at first. It explained it as a trail that shows where you are on the site — like “Home > SEO Basics > Post Title.” It sounded useful, so I tried to set it up.
I assumed a plugin would do it. Turns out Astra’s free version doesn’t give you a simple toggle for breadcrumbs.
It suggested a code-based workaround: register a shortcode using your child theme’s functions.php file. I’d never touched a child theme before and wasn’t confident with code. I created astra-child, pasted the code, and hit save. The first time it broke — white screen. I reverted it via FTP, found a missing semicolon, tried again. Second time it worked.
Breadcrumbs aren’t a magic SEO fix — they help search engines understand your site’s hierarchy. They tell crawlers “where this page sits in the site structure,” which makes internal linking clearer and helps users navigate. Once it was up, the URL structure on my post pages finally made sense.
While I was in the Customizer (Appearance → Customize in WordPress), I browsed around. Under Astra’s Post Types → Single Post, you can toggle which modules appear on your post pages. I found “Comments” and “Related Posts” useful, so I turned them on. Some themes call this section something different, but the idea is the same — you can often enable or disable these modules without touching code. It’s worth a quick look when you’re setting up your site.
Restructure Your Homepage
After working through DeepSeek’s suggestions, I ran Hostinger’s AI site audit. It pointed me toward two areas I hadn’t considered. The first was homepage structure.
At that point I only had three or four posts. Not a lot of content — but instead of pretending I had more, I focused on making what I had easier to find.
I wanted visitors to land on the site and immediately understand what it’s about and where to start.
I built an “SEO Basics” section on the homepage and used it as the entry point. I cleaned up the navigation and hid empty categories. Every post went into that section. I used Gutenberg’s Query Loop block to pull posts from the same category and display them as cards with consistent spacing, background, and shadows. I saved it as a reusable block so I could duplicate it later for new categories.
After that change, the homepage looked organized — no new content, but the structure told visitors where to start and what the site was about.
About & Author Information
Improve Your About Page
The third suggestion from DeepSeek was to work on the About page.
It said an About page should tell readers who you are and why you’re running the site. I opened mine and realized I had created it as a blog post — not a page. That’s why it showed a published date and author info like a regular post.
I rebuilt it as a proper page. Used a simple template, wrote who I am, why I built the site, and what readers can get from it. Then I added a photo of myself with my name on it.
One more thing: my About page URL was /about-2/ because a category was already using /about/. URLs have to be unique — once I deleted that category, I could finally change it to /about/.
Strengthen Author Credibility
The second area Hostinger’s audit pointed out was author credibility.
I looked at my actual posts — no author photo, no bio, no name. Nothing.
I installed a free plugin called Simple Author Box, filled in my profile in WordPress user settings, and uploaded a profile photo via Gravatar. I kept the colors simple — off-white, gray borders, a touch of blue.
After that, the site didn’t feel like “just an account” anymore. It felt like there was someone behind it.
Final Checklist
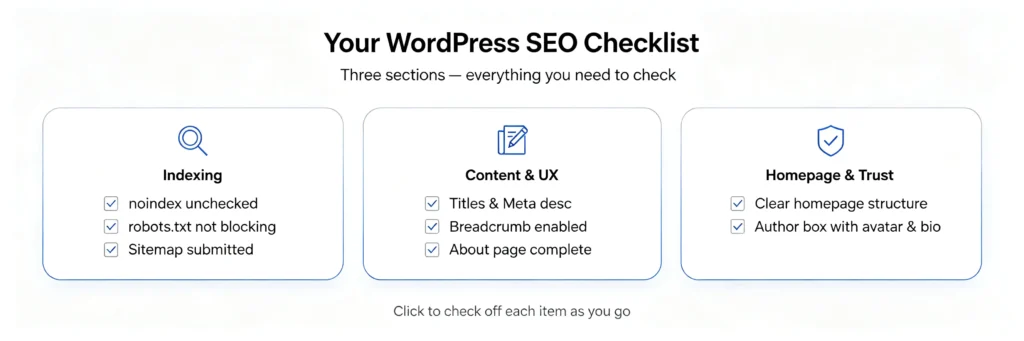
Indexing
- □ “Discourage search engines from indexing this site” is unchecked (Settings → Reading)
- □
/robots.txtexists and doesn’t containDisallow: / - □ Sitemap is generated and submitted in GSC
- □ Core pages are submitted via GSC’s “URL Inspection” tool
Content & UX
- □ Homepage title and meta description clearly state the site’s topic
- □ Breadcrumb navigation is enabled and hierarchy is correct
- □ All pages and posts have unique titles and meta descriptions
- □ About page is complete (who you are, what the site is for)
Homepage & Trust
- □ Homepage is organized by topic — readers know where to start
- □ Posts include an author box with avatar and bio
📚 SEO Basics Series — 5-Step Core Workflow
This is Step 3: Technical Optimization. If you’re starting from the beginning, here’s the full path:
• What Is Keyword Research? – Concepts & Fundamentals
• Keyword Research – Full Workflow
• AI-Powered Keyword Research Tutorial
• How to Use AI for SEO Content (8-Step Guide)
• WordPress SEO Checklist – Start with GSC ← You are here

About Shelldy
An ordinary practitioner learning SEO from scratch. By day, I work in the internet industry; by night, I turn what I’ve learned into articles. I believe that honest learning records are more valuable than rehashed tips. Feel free to connect and exchange ideas.
Pingback: How to Improve SEO Score on WordPress: Complete 72-94 Guide